How to follow and concentrate on a lace knitting pattern
I’ve taken up knitting again but seemed to hit a mental fog while doing a lacy border on this Sirdar pattern:
After much knitting and undoing, I took a step back and reviewed where I was going wrong – not just the actual stitches but the mental processes. Eventually I came up with this formula:
Be kind to yourself
It’s all too easy to make unfavourable comparisons between our own apparent slowness and the amazing ability of someone else (or even our usual prowess!). In my case, I had to stop emulating my Mum who could knit a lacy cardigan while reading a story in Woman’s Weekly and deciding what to cook for dinner. I also had to decide that it was okay for me to slow down and knit slower than usual; that I didn’t have to keep it all in my head and to use any “crutches” that were available. These include: writing out the instructions (see below); keeping note of the number of rows that I’ve knitted, using markers…
Rewrite the instructions so that each row is on one line
The original instructions may not be on one line, which makes it harder for the eye to follow. Just re-writing the instructions so that each Row is on one line might solve the concentration problem.
Block out everything but the line that you’re working on
Physically: write out each line on a separate piece of paper. That way, your eye won’t jump to Row 2 when you should be knitting Row 1 of the pattern.
Mentally: block out external distractions eg the TV and internal distractions by dealing with hunger, dehydration, needing to go to the toilet… Forestall interruptions – tell family that you need to concentrate and leave the phone off the hook. Become aware of when your thoughts are intruding on your concentration.
Read the instructions aloud
This is where you might want to be alone!
This helps you to concentrate on each stitch and also to get into a rhythm.
For me, this all helped, but didn’t totally solve the problem. So:
Work out the number of stitches in a repeat (segment/bar)
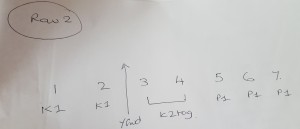
This lace pattern is repeated over 7 stitches with 4 stitches at the end. I tend to think of the repeat as a “bar”.
Use visual markers to show each “bar”
Having worked out how many stitches are in a repeat, I marked out every 7 stitches (leaving 4 stitches at the end) using safety pins or stitch markers. If I lost my place, it was easy enough to count from the previous safety pin or towards the next one to work out where I should be. It was also easy to count each “bar” of 7 stitches to ensure that I hadn’t missed a yarn over or whatever. If I had made a mistake, it was easier to locate where that mistake was and to frog back.
Of course, they had to be taken out and put in again after every line because of the extra 4 stitches at the end.
And it still didn’t totally solve the problem!
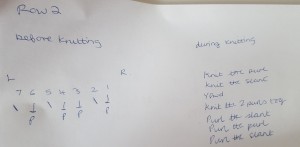
Rewrite the instructions in a way that makes sense to you
By rewriting the instructions, you will ensure that you understand them. By creating your own format, you are engaging your brain and creativity. You will probably come up with something that makes more visual sense to your brain. Write out each Row on a separate piece of paper so that your eye doesn’t jump from Row to Row.
Instructions written out by me
(Note – you don’t need to be able to follow my notation. Make up your own!)
Work out where you tend to go wrong and double check your work
On this pattern, I tended to go wrong on Row 1, especially when doing it the second time, forgetting to pass the slip stitch over the K2 tog and/or forgetting to do the final “yarn over”. So I highlighted this on my written instructions, emphasized these as I read the instructions aloud and double checked the number of stitches as I went along.
Highlight where extra care is needed
Take a break
Become aware of when you’re tiring mentally. Mark your place. Have a (non-alcoholic) drink if you’re dehydrated, do something different for a while or simply leave it for the day.
If all the above doesn’t work:
Revisit your re-writing of the instructions and try another method
Your instructions to yourself don’t need to be in words. You might make sketches or construct a chart.
This was the great Eureka! moment for me with this knitting pattern because after the very first Row 1, it showed the stitch that I was knitting into. I didn’t even need to use markers to show the bars or even block out interruptions.
Problem solved!
The finished article!
The amazing thing was that once I followed the above in my knitting challenge, I found my concentration was better, for example, when reading or doing Sudoko! And of course there’s many other learning/doing situations where at least some of the above formula can be adapted and applied.
I hope this helps. If you have any further tips, do please pass them on by contacting me!


